Top 10 Tips for Using Self Tapping Screws Effectively?
When it comes to construction and DIY projects, the use of Self Tapping Screws is crucial. Expert engineer Sarah Thompson emphasizes, "Mastering Self Tapping Screws can elevate your projects to the next level." This type of screw is designed to create its own hole, which saves time and effort. Understanding their proper use can significantly improve the outcome of any project.
Self Tapping Screws are not just convenient; they save labor costs too. They work well in various materials, including metal and wood. However, improper use can lead to stripped holes or even damaged materials. It's essential to choose the right screw type for specific tasks. Reflecting on common mistakes helps in honing skills. Learning from these challenges can lead to better techniques.
Moreover, many people underestimate the significance of screw length and thickness. Choosing the wrong size can affect stability. Self Tapping Screws can be a game-changer when used correctly. Their potential is vast, but so are the pitfalls. This guide offers ten tips to ensure effective use, avoiding common traps along the way.
Understanding Self Tapping Screws: What You Need to Know
Self-tapping screws are essential in construction and DIY projects. They form their own threads in materials, eliminating the need for pre-drilling. According to industry reports, around 70% of fastening applications now utilize self-tapping screws due to their efficiency and reliability. This shift underscores their growing importance in various sectors.
Understanding the structure of self-tapping screws is vital. The design features sharp threaded ends that penetrate materials like metal and plastic. This characteristic allows for a secure fit without additional hardware. However, improper use can lead to stripping or reduced holding power. For instance, using the wrong size can compromise the screw’s effectiveness. Data shows that nearly 30% of installers report issues linked to improper screw selection, emphasizing the need for careful consideration.
Choosing the right screw is not just about strength. The material and finish of the screw play significant roles in performance. For example, rust-resistant coatings are vital in outdoor settings. Yet, many overlook these details. Ensuring the correct application can lead to more durable outcomes. Awareness of these factors contributes to better project success rates and minimizes costly mistakes.
Choosing the Right Type of Self Tapping Screw for Your Project
When choosing the right type of self-tapping screw for your project, consider the material you'll be working with. Different screws are designed for various surfaces. Metal screws are ideal for metal applications, while wood screws should be used for wooden surfaces. Assess the thickness of the material as well; this can determine the screw length you need. A screw that is too long may damage underlying materials.
It's crucial to select the correct head type for your project as well. Flat heads are best for flush finishes, while round heads can provide better grip. Make sure to choose a screw with the right thread for your needs. Coarse threads are suitable for soft materials, while fine threads work well with hard materials. Remember, not all projects require the same screw; an oversight here can lead to failure down the line.
Sometimes, you might find that self-tapping screws can strip or break while in use. This is often due to over-tightening or using the wrong type. Reflecting on your choice of screws can save you future headaches. Taking the time to understand these details will enhance your project results, giving you the reliability you need for successful repairs or constructions.
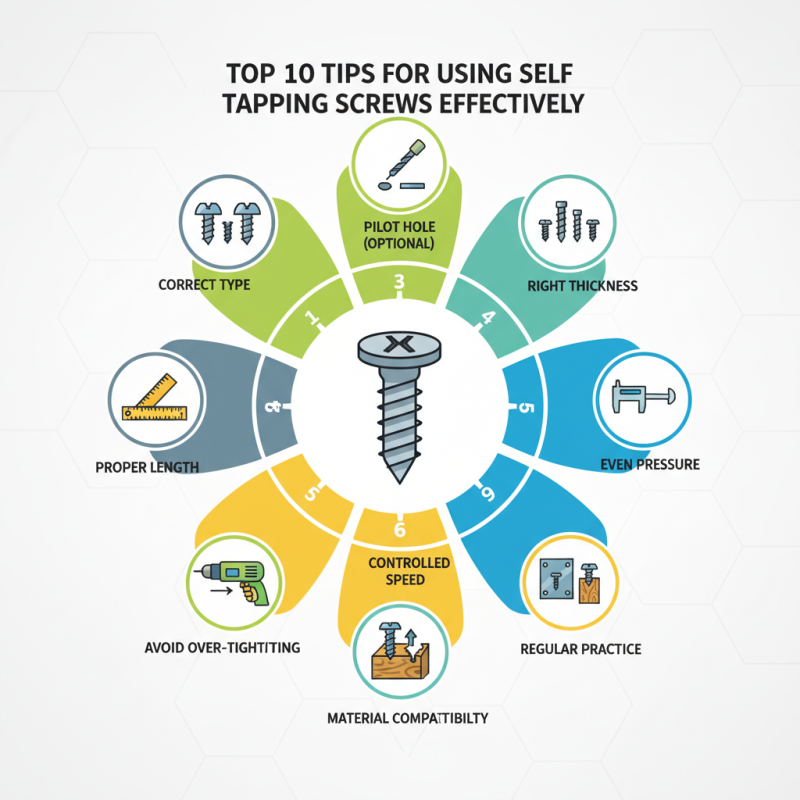
Top 10 Tips for Using Self Tapping Screws Effectively
| Tip Number | Tip Title | Description | Recommended Material |
| 1 | Choose the Right Screw Type | Select a screw designed for the specific material you are working with. | Metal, Wood, Plastics |
| 2 | Pre-Drill Holes if Necessary | In hard materials, pre-drilling can help avoid breaking or damaging screws. | Hardwoods, Metals |
| 3 | Use the Right Drill Bits | Using compatible drill bits can enhance screw performance and longevity. | High-Speed Steel, Titanium-Coated |
| 4 | Apply Proper Torque | Avoid overtightening which can strip the screws or material. | Varies with Material |
| 5 | Consider Coating | Select screws with coatings for corrosion resistance in certain environments. | Galvanized, Stainless Steel |
| 6 | Ensure Proper Alignment | Align the materials correctly before installation to avoid issues. | All Materials |
| 7 | Use Washers When Necessary | Add washers to distribute load or protect the surface of the material. | Soft Materials |
| 8 | Check for Compatibility with Fasteners | Ensure self-tapping screws are compatible with other fasteners in use. | Various Materials |
| 9 | Consider Length and Diameter | Pick the correct length and diameter for optimal hold and support. | Varies with Application |
| 10 | Follow Manufacturer Instructions | Refer to specific guidelines for screw installation to achieve the best results. | All Types |
Preparing Surfaces for Optimal Self Tapping Screw Performance
Preparing surfaces is crucial for optimal performance when using self-tapping screws. Clean, smooth surfaces allow screws to penetrate easily and create a tight fit. Dust, paint, or old materials can hinder this. For best results, ensure surfaces are free from debris before installation.
Testing different materials can lead to unexpected challenges. Wood, metal, and plastic each react differently to self-tapping screws. Sometimes, screws go in easily but fail to hold. A common mistake is using screws that are too long or too short for the material thickness. This can lead to stripped threads or loose fittings.
It’s beneficial to practice on scrap materials. This helps gauge the right pressure and technique. A misaligned screw can create gaps, decreasing strength. Every project may require adjustments based on the material and environment. Recognizing these nuances can improve the overall effectiveness of your work with self-tapping screws.
Proper Installation Techniques for Self Tapping Screws
Self-tapping screws are unique fasteners designed to create their own thread. When installed properly, they can provide strong and durable connections. However, improper installation can lead to stripped threads or weak bonds. It's essential to choose the right screw for the material you are working with. For instance, metal screws are best suited for metal surfaces, while wood screws perform well in wooden applications.
Before inserting a self-tapping screw, pre-drilling can be helpful. It helps to avoid splitting the material, especially in wood. Ensure the drill bit's size matches the screw's diameter. Use a steady hand to maintain control while drilling. Applying sufficient pressure is crucial but avoid excessive force, as this might damage the screw or the material. Consider using a lubricant to ease the ratcheting motion when driving screws into tougher materials. This can minimize wear and tear on both the screw and the tool.
Pay attention to your angles during installation. A misaligned screw can weaken the hold and lead to complications later. If you notice any resistance, back off and check for alignment. Reflect on your techniques and adapt them as needed. Experimenting with different practices may help improve your skills. Self-tapping screws are effective, but learning these techniques is vital for achieving optimal results.
Maintenance and Troubleshooting Tips for Self Tapping Screws
When working with self-tapping screws, regular maintenance is key to their performance. Check for rust or corrosion regularly. Even tiny spots can lead to failure under stress. For outdoor projects, consider using a protective coating to prolong the lifespan. Ensure that screws are adequately seated. Over-tightening can strip threads, while under-tightening can make connections loose.
Troubleshooting issues is essential for successful projects. If screws don’t penetrate materials properly, verify the drilling speed and pressure. A slow, steady pace often yields the best results. Pay attention to the material type. Harder materials may require pre-drilling. It’s crucial to monitor the installation closely. Mistakes often occur when you rush. Take breaks to reassess your approach. Remember, even seasoned professionals can misjudge the right screw for a job.
Additionally, when removing screws, use the right tools. Improper tools can damage both the screw and surrounding material. If a screw is stripped, consider using pliers to grip and turn it. If all else fails, a screw extractor may be necessary. Reflecting on these challenges will improve future projects and lead to better results.